漫漫技术路

  • 首页

  • 标签

  • 分类

  • 归档

  • 搜索

rollup + es6最佳实践

发表于 2016-10-02 | 更新于 2018-11-30 | 分类于 前端技术

简单说下rollup就是只将调用过的模块打包,做到尽量精简的打包。

使用webpack 1.X 版本是无法利用该特性来避免引入冗余模块代码的

webpack2 已经出来好几款 beta 版本了,同样也加上了对 Tree-shaking 的支持

1.src中的文件

jquery.js

1
2
3
4
5
// 出口
import init from './init';
init(jQuery);

export default jQuery;

init.js

1
2
3
4
5
6
7
8
9
10
11
12
13
14
15
16
17
var init = function(jQuery){
jQuery.fn.init = function (selector, context, root) {
if (!selector) {
return this;
} else {
var elem = document.querySelector(selector);
if (elem) {
this[0] = elem;
this.length = 1;
}
return this;
}
};
jQuery.fn.init.prototype = jQuery.fn;
};

export default init;

2.安装包

pakage.json 包管理

1
npm init

开始安装

1
npm i rollup rollup-plugin-babel babel-preset-es2015-rollup --save-dev

3.编译

3.1 命令行编译

1
rollup src/jquery.js --output bundle.js -f cjs

3.1.1 编译成commonjs格式的文件

1
2
3
4
5
6
7
8
9
10
11
12
13
14
15
16
17
18
19
20
21
'use strict';

var init = function(jQuery){
jQuery.fn.init = function (selector, context, root) {
if (!selector) {
return this;
} else {
var elem = document.querySelector(selector);
if (elem) {
this[0] = elem;
this.length = 1;
}
return this;
}
};
jQuery.fn.init.prototype = jQuery.fn;
};

init(jQuery);

module.exports = jQuery;

另外还有几种格式

1
amd /  es6 / iife / umd

3.1.2 umd

1
rollup src/jquery.js --output bundle.js -f umd

会报错

1
You must supply options.moduleName for UMD bundles

这是因为我们在jquery.js中

1
export default jQuery;

我们使用配置方式进行编译,就能指定导出的模块名moduleName: 'jQuery'

3.2 配置编译–rollup -c rollup.config.dev.js

rollup.config.dev.js

1
2
3
4
5
6
7
8
9
import babel from 'rollup-plugin-babel';

export default {
entry: 'src/jquery.js',
format: 'iife',
moduleName: 'jQuery',
plugins: [babel() ],
dest: 'bundle.js',
};

src中.babelrc

1
2
3
4
5
{
presets: [
["es2015", { "modules": false }]
]
}

注意{ "modules": false }一定要有,否则一直报错,错误如下所示

1
2
3
4
5
6
7
8
9
Error transforming E:\javascript\rollup-demo\src\jquery.js with 'babel' plugin:                                        It looks like your Babel configuration specifies a module transformer. Please                                        disable it. If you're using the "es2015" preset, consider using "es2015-rollup"                                        instead. See https://github.com/rollup/rollup-plugin-babel#configuring-babel f                                       or more information
Error: Error transforming E:\javascript\rollup-demo\src\jquery.js with 'babel' plugin: It looks like your Babel configuration specifies a module transformer. Please disable it. If you're using the "es2015" preset, consider using "es2015- rollup" instead. See https://github.com/rollup/rollup-plugin-babel#configuring- babel for more information
at preflightCheck (E:\javascript\rollup-demo\node_modules\rollup-plugin-bab el\dist\rollup-plugin-babel.cjs.js:43:102)
at Object.transform$1 [as transform] (E:\javascript\rollup-demo\node_module s\rollup-plugin-babel\dist\rollup-plugin-babel.cjs.js:104:18)
at C:\Users\Ruyi\AppData\Roaming\npm\node_modules\rollup\src\utils\transfor m.js:19:35
at process._tickCallback (node.js:379:9)
at Function.Module.runMain (module.js:459:11)
at startup (node.js:138:18)
at node.js:974:3

命令

1
rollup -c rollup.config.dev.js

3.3 配置编译–node rollup.config.dev.js

rollup.config.dev.js

1
2
3
4
5
6
7
8
9
10
11
12
13
14
var rollup = require( 'rollup' );
var babel = require('rollup-plugin-babel');

rollup.rollup({
entry: 'src/jquery.js',
plugins: [ babel() ]
}).then( function ( bundle ) {
bundle.write({
format: 'umd',
moduleName: 'jQuery', //umd或iife模式下,若入口文件含 export,必须加上该属性
dest: 'bundle.js',
sourceMap: true
});
});

参考阅读:

  • Issue rollup -c
  • rollup.js官网 http://rollupjs.org/guide/
  • ## 冗余代码都走开——前端模块打包利器 Rollup.js 入门

一步一步DIY jQuery库1

发表于 2016-10-02 | 更新于 2018-11-30 | 分类于 前端技术

前一段时间,看到一篇系列文章《从零开始,DIY一个jQuery 1-3》三篇文章从头讲解如何DIY一个jQuery,感觉挺有意思,今天想试一试看看。

我在前端已经有了一年的经验,jquery几乎是每天都会使用到,但是现在还没时间去研究一下它的源码,即使这样我也想动手尝试下DIY一个JQuery库,我相信这可以加深我对jquery的理解,当然我也试着去学习jquery的源码,这很可能会写成一个系列的文章,这个系列文章以一个入门的jquery原理探索者的视角。当然,这篇文章作为入门的入门。

【注】所有代码挂在我的github上

1.实现一个基本的框架

1.1 整体

  • 整体是个闭包,独立作用域,避免污染全局变量
  • 不用new,是因为使用了工厂模式,new放在了内部return new jQuery.fn.init(selector)
  • jQuery是最基础的对象,方法放在了jQuery.prototype中,即是jQuery.fn
  • $.extend / $.fn.extend 来扩展静态方法和原型方法
  • 使用全局变量window.$, window.jQuery即可调用
  • return this为了链式调用
1
2
3
4
5
6
7
8
9
10
11
12
13
14
15
16
17
18
19
20
21
22
23
24
25
26
27
28
29
30
31
32
33
34
35
36
//IIFE 独立作用域
(function() {
var version = '0.0.1';

jQuery = function(selector) {
return new jQuery.fn.init(selector); //jQuery实例的构造函数已经变成了 jQuery.fn.init
};

/*jQuery.fn 主要方法*/
jQuery.fn = jQuery.prototype = {
jquery: version,
construct: jQuery,
//方法
setBackground: function(color) {
this[0].style.background = color;
return this; //链式调用
},
};

var init = jQuery.fn.init = function(selector) {
if (!selector) {
return this;
} else {
var elem = document.querySelector(selector);
if (elem) {
this[0] = elem;
this.length = 1;
}
console.info(this);
return this;
}
};
init.prototype = jQuery.prototype; //把 jQuery.fn.init 的原型指向 jQuery 的原型(jQuery.prototype / jQuery.fn)即可

window.$ = window.jQuery = jQuery;
})();

测试

1
2
3
4
5
var $div = $('div');
console.log($div);
$div.setBackground('blue');
console.log($div.jquery); //0.0.1
console.log($.fn.jquery); //0.0.1

$div的结果

1
2
3
- j…y.fn.init {0: div, length: 1}
+ 0:div
+ length:1

1.2 冲突处理

1
2
3
4
5
6
7
8
9
10
11
12
13
14
/*冲突处理*/
var _jQuery = window.jQuery,
_$ = window.$;
//deep 参数类型为 Boolean,若为真,表示要求连window.jQuery 变量都需要吐回去
jQuery.noConflict = function(deep) {
if (window.$ === jQuery) {
window.$ = _$;
}
//确保window.jQuery没有再次被改写
if (deep && window.jQuery === jQuery) {
window.jQuery = _jQuery;
}
return jQuery; //返回 jQuery 接口引用
};

测试

1
2
var $$$ = jQuery.noConflict();
$$$('div').setBackground('red');

1.3 $.extend / $.fn.extend 来扩展静态方法和原型方法

1
2
3
4
5
6
jQuery.extend = jQuery.fn.extend = function() {
var target = arguments[0] || {};
for(var key in target){
jQuery.fn[key] = target[key];
}
};

但是调用必须是$().min而不能是$.min

1
2
3
4
5
6
7
8
9
jQuery.extend({
min: function(a, b) {
return a < b ? a : b;
},
max: function(a, b) {
return a > b ? a : b;
}
});
console.log($().min(3,5));

当然这只是个人的一些想法,我们来仿照jquery源码实现

1
2
3
4
5
6
7
8
9
10
11
12
13
14
15
16
17
18
19
20
21
22
23
24
25
26
27
28
29
30
31
32
33
34
35
36
37
38
39
40
41
42
43
44
45
46
47
48
49
50
51
52
53
54
var isObject = function(obj) {
return Object.prototype.toString.call(obj) === "[object Object]";
};
var isArray = function(obj) {
return Object.prototype.toString.call(obj) === "[object Array]";
};
var options, i = 1,
length = arguments.length,
target = arguments[0] || {},
deep = false; //默认为浅复制

if (typeof target === "boolean") {
deep = target;
taeget = arguments[i] || {};
i++;
}
if (typeof target !== "object" && typeof target !== "function") {
target = {};
}

//target后面没有其他参数了(要拷贝的对象),直接扩展jQuery自身,target并入jQuery
if (i === length) {
target = this;
i--;
}
for (; i < length; i++) {
if ((options = arguments[i]) != null) {
var name, clone, copy;
for (name in options) {
src = target[name]; //jQuery是否已经有该属性
copy = options[name];
if (target === copy) {
continue;
}
//1-深拷贝,且确保被拷属性为对象/数组
if (deep && copy && (isObject(copy)||(copyIsArray = isArray(copy)))){
//被拷贝属性为数组
if(copyIsArray){
copyIsArray = false;
//被合并属性
clone = src && isArray(src)?src:[];
}else{//被拷贝属性为对象
clone = src && isArray(src)?src:{};
}
//右侧递归,直到内部属性值是非对象
target[name] = jQuery.extend(deep,clone,copy);
}else if(copy!==undefined){//2-非对象/数组,或者浅复制的情况
target[name] = copy;//递归结束
}
}
}
}
//返回修改后的target
return target;

拷贝主要分为两个部分:

1
2
3
4
5
6
//1-深拷贝,且确保被拷属性为对象/数组
if (deep && copy && isObject(copy)||(copyIsArray = isArray(copy))){
/*...*/}
//2-非对象/数组,或者浅复制的情况
else if(copy!==undefined){
}

使用的几种情况

1
2
3
4
$.extend(  targetObj,  copyObj1[,  copyObj2...]  )
$.extend( true, targetObj, copyObj1[, copyObj2...] )
$.extend( copyObj )
$.extend( true, copyObj

测试

1
2
3
4
5
6
7
8
9
 jQuery.extend({
min: function(a, b) {
return a < b ? a : b;
},
max: function(a, b) {
return a > b ? a : b;
}
});
console.log($.min(3, 5));

注意:这个时候只是使用isObject,isArray并不严谨
在某些浏览器中,像 document 在 Object.toSting 调用时也会返回和 Object 相同结果;
这些我们将在《一步一步DIY一个自己jQuery库2》中进行补充。

2.全部代码

1
2
3
4
5
6
7
8
9
10
11
12
13
14
15
16
17
18
19
20
21
22
23
24
25
26
27
28
29
30
31
32
33
34
35
36
37
38
39
40
41
42
43
44
45
46
47
48
49
50
51
52
53
54
55
56
57
58
59
60
61
62
63
64
65
66
67
68
69
70
71
72
73
74
75
76
77
78
79
80
81
82
83
84
85
86
87
88
89
90
91
92
93
94
95
96
97
98
99
100
101
102
103
104
105
106
107
108
109
110
111
112
113
114
115
116
117
118
119
120
121
122
123
124
125
126
127
128
129
130
131
132
133
134
135
136
137
138
139
140
//IIFE 独立作用域
(function() {
var version = '0.0.1';

jQuery = function(selector) {
return new jQuery.fn.init(selector); //jQuery实例的构造函数已经变成了 jQuery.fn.init
};

/*冲突处理*/
var _jQuery = window.jQuery,
_$ = window.$;
//deep 参数类型为 Boolean,若为真,表示要求连window.jQuery 变量都需要吐回去
jQuery.noConflict = function(deep) {
if (window.$ === jQuery) {
window.$ = _$;
}
//确保window.jQuery没有再次被改写
if (deep && window.jQuery === jQuery) {
window.jQuery = _jQuery;
}

return jQuery; //返回 jQuery 接口引用
};

/*jQuery.fn 主要方法*/
jQuery.fn = jQuery.prototype = {
jquery: version,
construct: jQuery,
//方法
setBackground: function(color) {
this[0].style.background = color;
console.warn(this);
return this;
},
};

var init = jQuery.fn.init = function(selector) {
if (!selector) {
return this;
} else {
var elem = document.querySelector(selector);
if (elem) {
this[0] = elem;
this.length = 1;
}
console.info(this);
return this;
}
};
init.prototype = jQuery.prototype; //把 jQuery.fn.init 的原型指向 jQuery 的原型(jQuery.prototype / jQuery.fn)即可

jQuery.extend = jQuery.fn.extend = function() {
var isObject = function(obj) {
return Object.prototype.toString.call(obj) === "[object Object]";
};
var isArray = function(obj) {
return Object.prototype.toString.call(obj) === "[object Array]";
};
var options, i = 1,
length = arguments.length,
target = arguments[0] || {},
deep = false; //默认为浅复制

if (typeof target === "boolean") {
deep = target;
taeget = arguments[i] || {};
i++;
}
if (typeof target !== "object" && typeof target !== "function") {
target = {};
}

//target后面没有其他参数了(要拷贝的对象),直接扩展jQuery自身,target并入jQuery
if (i === length) {
target = this;
i--;
}
for (; i < length; i++) {
if ((options = arguments[i]) != null) {
var name, clone, copy;
for (name in options) {
src = target[name]; //jQuery是否已经有该属性
copy = options[name];
if (target === copy) {
continue;
}
//深拷贝,且确保被拷属性为对象/数组
if (deep && copy && (isObject(copy) || (copyIsArray = isArray(copy)))) {
//被拷贝属性为数组
if (copyIsArray) {
copyIsArray = false;
//被合并属性
clone = src && isArray(src) ? src : [];
} else { //被拷贝属性为对象
clone = src && isArray(src) ? src : {};
}
//右侧递归,直到内部属性值是非对象
target[name] = jQuery.extend(deep, clone, copy);
} else if (copy !== undefined) { //非对象/数组,或者浅复制的情况
target[name] = copy; //递归结束
}
}
}
}

//返回修改后的target

return target;

};

window.$ = window.jQuery = jQuery;
})();

//测试
var $div = $('div');
console.log($div);
$div.setBackground('blue');
console.log($div.jquery); //0.0.1
console.log($.fn.jquery); //0.0.1
console.log(jQuery.extend());
console.log($.extend.jquery);
//冲突
/*var $$$ = jQuery.noConflict();
$$$('div').setBackground('red');*/
//
jQuery.extend({
min: function(a, b) {
return a < b ? a : b;
},
max: function(a, b) {
return a > b ? a : b;
}

});
console.info(jQuery.prototype);
console.info(jQuery);
// console.log($().min(3,5));
// console.log($.prototype.min(3, 5));
console.log($.min(3, 5));

参考阅读:

  • 从零开始,DIY一个jQuery(1)
  • 从零开始,DIY一个jQuery(2)
  • 从零开始,DIY一个jQuery(3)

OpenLayers 3实践与原理探究2-ol3基础入门案例

发表于 2016-09-28 | 更新于 2018-11-30 | 分类于 WebGIS

【注】所有代码挂在我的github上

0.实例

在OpenLayers3官网的下载页面下载我们在开发工程中需要的文件(如:v3.17.1-dist.zip),实际工程中包含两个文件ol.js,ol.css
先看一个实例代码如下:

1
2
3
4
5
6
7
8
9
10
11
12
13
14
15
16
17
18
19
20
21
22
23
24
25
26
27
28
29
30
31
32
33
34
35
36
37
38
39
40
41
<!DOCTYPE html>
<html lang="en">

<head>
<meta charset="UTF-8">
<title>1-TileWMS</title>
<link rel="stylesheet" href="css/ol.css">
</head>

<body>
<div id="map">
</div>
<script type="text/javascript" src="js/ol-debug.js"></script>
<script type="text/javascript">
/*初始化地图*/
var map = new ol.Map({
target: 'map', //document.getElementById("map")

layers: [
new ol.layer.Tile({
title: "Global Imagery",
source: new ol.source.TileWMS({
url: 'http://demo.boundlessgeo.com/geoserver/wms',
params: {
'LAYERS': 'ne:NE1_HR_LC_SR_W_DR'
}
})
})
],
view: new ol.View({
projection: 'EPSG:4326', //WGS 84
center: [0, 0],
zoom: 2,
maxResolution: 0.703125
}),

});
</script>
</body>

</html>

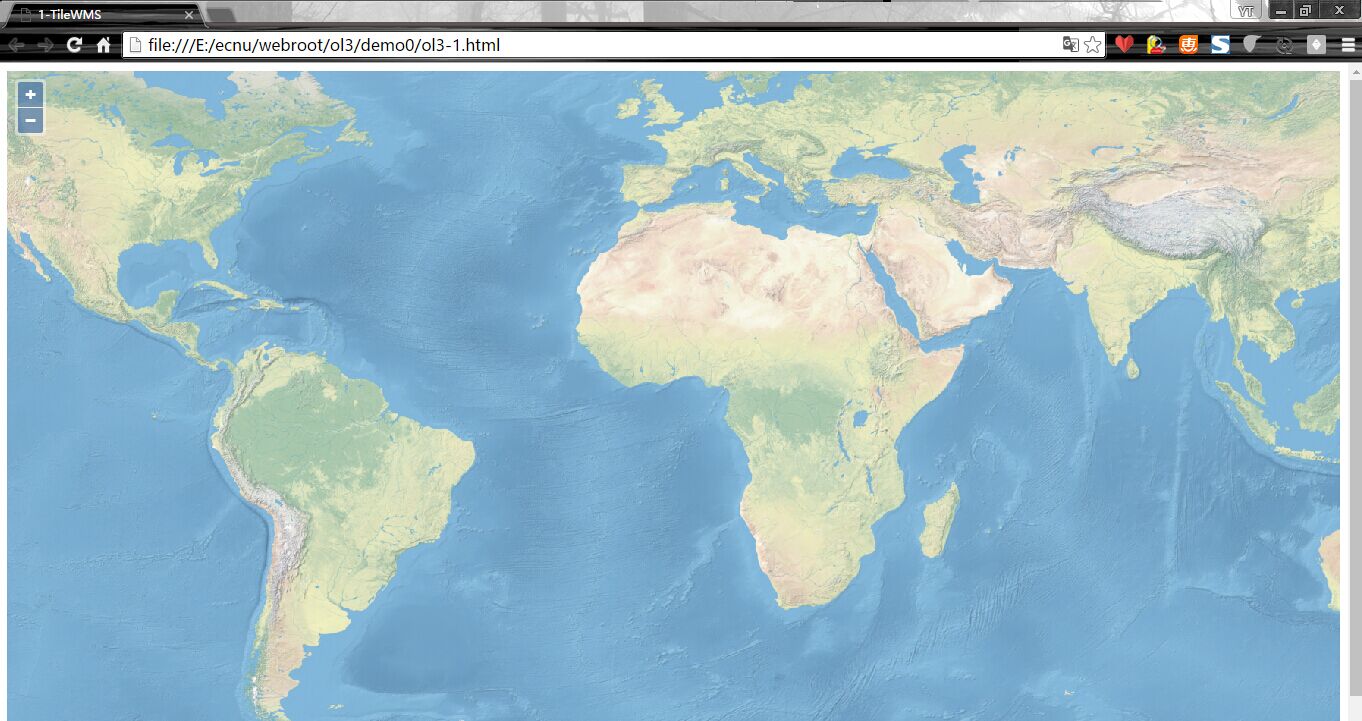
效果图:
ol3讲解实例效果图

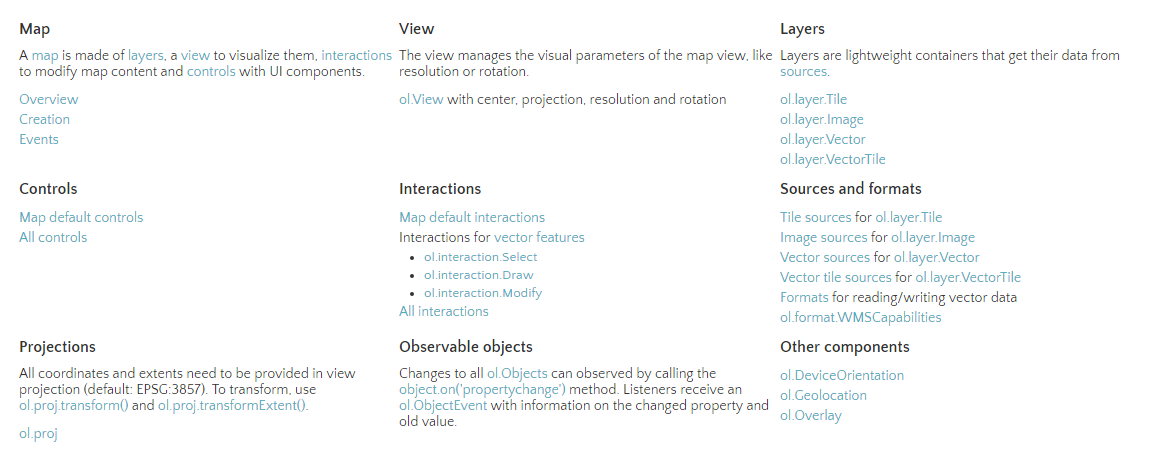
通过api的overview我们可以看到ol3的核心部件
ol3-api-overview

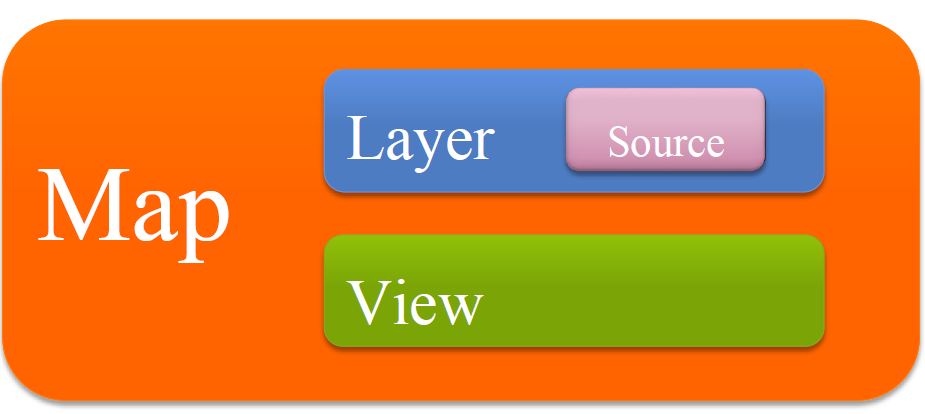
1.基本概念

ol3基本概念的关系

1.1 Map

Map(ol.Map)是OL3的核心部件,它被呈现在target容器上(div)。也可以使用setTarget方法。
位置:ol/ol/map.js

1
var map = new ol.Map({target: 'map'});

1.2 View

ol.View负责地图的中心点,放大,投影之类的设置。
一个ol.View实例包含投影projection,该投影决定中心center 的坐标系以及分辨率的单位,如果没有指定(如下面的代码段),默认的投影是球墨卡托(EPSG:3857),以米为地图单位。

放大zoom 选项是一种方便的方式来指定地图的分辨率,可用的缩放级别由maxZoom (默认值为28)、zoomFactor (默认值为2)、maxResolution (默认由投影在256×256像素瓦片的有效成都来计算) 决定。起始于缩放级别0,以每像素maxResolution 的单位为分辨率,后续的缩放级别是通过zoomFactor区分之前的缩放级别的分辨率来计算的,直到缩放级别达到maxZoom 。

1
2
3
4
5
6
7
8
9
10
var map = new ol.Map({
target: 'map',
view: new ol.View({
projection: 'EPSG:4326', //WGS 84
center: [0, 0],
zoom: 2,
maxResolution: 0.703125
}),

});

1.3 Source

OpenLayers 3使用ol.source.Source子类获取远程数据图层,包含免费的和商业的地图瓦片服务,如OpenStreetMap、Bing、OGC资源(WMS或WMTS)、矢量数据(GeoJSON格式、KML格式…)等。

1
var osmSource = new ol.source.OSM();

1.4 Layer

一个图层是资源中数据的可视化显示,OpenLayers 3包含三种基本图层类型:ol.layer.Tile(瓦片)、ol.layer.Image(图片样式的图层)和 ol.layer.Vector(矢量图层)。

  • ol.layer.Tile 用于显示瓦片资源,这些瓦片提供了预渲染,并且由特定分别率的缩放级别组织的瓦片图片网格组成。
  • ol.layer.Image用于显示支持渲染服务的图片,这些图片可用于任意范围和分辨率。
  • ol.layer.Vector用于显示在客户端渲染的矢量数据。
1
var osmLayer = new ol.layer.Tile({source: osmSource}); map.addLayer(osmLayer);

1.5 控件与交互

1.5.1 控件

1
2
3
4
5
6
7
8
9
10
var map = new ol.Map({
controls: ol.control.defaults().extend([
new ol.control.FullScreen(), //全屏控件
new ol.control.ScaleLine(), //比例尺
new ol.control.OverviewMap(), //鹰眼控件
new ol.control.Zoom(),
]),
layers: [bglayer, vector], //添加两个图层
target: 'map', //div#id='map'
});

1.5.2 交互

1
2
3
4
5
6
7
8
9
10
11
12
var select = new ol.interaction.Select({
wrapX: false
});

var modify = new ol.interaction.Modify({
features: select.getFeatures()
});
var map = new ol.Map({
layers: [bglayer, vector], //添加两个图层
target: 'map', //div#id='map'
interaction:ol.interaction.defaults().extend([select, modify])
});

或者用方法的方式添加:

1
2
3
4
5
6
7
draw = new ol.interaction.Draw({
source: source,
type: /** @type {ol.geom.GeometryType} */ (shapeName),
geometryFunction: geometryFunction,
maxPoints: maxPoints
});
map.addInteraction(draw); //增加的交互

this指针总结

发表于 2016-09-28 | 更新于 2018-11-30 | 分类于 前端技术

文章只是简单列举了方式和一些会改变this指针的情况

1.探寻之,必昭然若揭

  1. new绑定 this–>新创建的对象
    var bar = new foo()
  2. call/bind 硬绑定 this–>指定的对象
    var bar = foo.call(obj2)
  3. 隐式绑定 this–>上下文对象
    var bar = obj1.foo()
  4. 默认绑定 this–>全局对象window

四种情况也是按照优先级排列的

2.实践之,定了然于胸

2.1 回掉函数会改变this指针

绑定

1
2
3
dbTools.queryUsrDB2Datas(function(){
usrResDiv.fyDiv.apply(usrResDiv,arguments);
});

2.2 setTimeout/setinterval函数会改变this指针(例子见第三部分)

2.3 绑定的例外

  • foo.call(null) 使用null或者undefined,忽略传入对象的this,实际运用的是默认绑定,这也是这样方法的弊端,this指向window。
    修改var DMZ = Object.create(null); foo.apply(DMZ,[2,3]);

  • 间接引用

1
2
3
4
5
6
7
8
9
10
function foo(){
console.log(this.a);
}
var a = 2;
var o = {a:3,foo:foo};
var p = {a:4};

o.foo();//3
(p.foo = o.foo)(); //2 this-->window
p.foo(); //4

p.foo = o.foo返回值是目标函数的引用,因此调用位置是foo(),而不是p.foo(),o.foo();

3.避免之,需谨小事微

除了第一部分的方法外,还有一些常用的方法。

3.1 ES5中我们经常会使用self = this,如:

1
2
3
4
5
6
7
8
9
10
11
function foo(){
var self = this;
setTimeout(function(){
console.log(self.a);
},100);
}

var obj = {
a:2;
}
foo.call(obj);//2

3.2 ES6中的箭头函数(this词法)

1
2
3
4
5
6
7
8
9
10
function foo(){
setTimeout => {
console.log(this.a);//this继承来自foo()
},100);
}

var obj = {
a:2;
}
foo.call(obj);//2

webpack基础实践2

发表于 2016-09-28 | 更新于 2018-11-30 | 分类于 前端技术

本文在webpack基础实践1的基础上,主要阐述的是模块化和ES6与webpack的结合使用。

1.模块化

commonJS/CMD风格
module1.js

1
2
3
4
5
6
7
8
9
10
var obj = {
val:"hello from m1",
sayHi:function(){
document.write('hi');
},
sum:function(a,b){
return a+b;
}
};
module.exports = obj;

AMD风格
module2.js

1
2
3
define(['./module1.js'],function(m1){
return "1+2="+m1.sum(1,2);
});

入口文件entry.js

1
2
3
4
5
6
var m1 = require("./module1.js");
document.write("<br>");
document.write(m1.val);
document.write("<br>");
var m2 = require("./module2.js");
document.write(m2);

结果显示为

1
2
hello from m1
1+2=3

当然实际项目中不建议两种风格的模块都使用,选择其中一种模块风格即可。

2.ES6

webpack是支持babel转化器的,所以可以将ES6代码转为ES5供现在的浏览器使用

  • 1) 安装babel依赖库
1
2
3
npm install babel-loader --save-dev
npm install babel-core --save-dev
npm install babel-preset-es2015 --save-dev
  • 2) 新建一个.babelrc文件,内容是:
1
2
3
4
5
{
"presets": [
"es2015"
]
}
  • 3) 配置webpack.config.js文件

    1
    2
    3
    module: {loaders: [
    { test: /\.js$/,exclude: /node_modules/,loader: 'babel-loader',}
    ]
  • 4) 入口文件entry.js中就可以使用了

1
2
/*es6*/
require("./es6test2.js");

es6test2.js

1
2
3
4
import Point from './es6test1';

let p = new Point(1,2);
document.write(p.toString());

es6test1.js

1
2
3
4
5
6
7
8
9
10
11
12
//定义类
class Point {
constructor(x, y) {
this.x = x;
this.y = y;
}

toString() {
return '(' + this.x + ', ' + this.y + ')';
}
}
export default Point;

编译完成即可

3.总结

3.1 配置文件webpack.config.js

1
2
3
4
5
6
7
8
9
10
11
12
13
14
15
module.exports = {
entry: "./src/home/js/entry.js", //入口文件
output: {
path: __dirname,
filename: "bundle.js"
},
module: {
loaders: [
{ test: /\.css$/, loader: "style!css" }, //css加载器
{ test: /\.scss$/, loader: "style!css!sass" }, //sass加载器
{ test: /\.(jpg|png)$/, loader: "url?limit=8192" }, //图片加载器
{ test: /\.js$/, exclude: /node_modules/, loader: 'babel-loader', }
]
}
};

3.2 加载的依赖库package.json

1
2
3
4
5
6
7
8
9
10
11
12
13
14
15
16
17
18
19
20
21
22
23
{
"name": "webpackdemo",
"version": "1.0.0",
"description": "webpack demo",
"main": "index.js",
"scripts": {
"test": "echo \"Error: no test specified\" && exit 1"
},
"author": "",
"license": "ISC",
"devDependencies": {
"babel-core": "^6.14.0",
"babel-loader": "^6.2.5",
"babel-preset-es2015": "^6.14.0",
"css-loader": "^0.24.0",
"file-loader": "^0.9.0",
"node-sass": "^3.8.0",
"sass-loader": "^4.0.0",
"style-loader": "^0.13.1",
"url-loader": "^0.5.7",
"webpack": "^1.13.2"
}
}

3.3 入口文件entry.js

1
2
3
4
5
6
7
8
9
10
11
12
13
14
15
16
17
18
19
20
21
22
require("./style.css");
require("./index.scss");

document.write(require("./content.js"));
document.write("</br/>");

var img = document.createElement("img");
img.src = require("./img/webpack.png");
document.body.appendChild(img);
document.write("</br/>");

/*模块化*/
var m1 = require("./module1.js");
document.write("</br/>");
document.write(m1.val);
document.write("<br>");
var m2 = require("./module2.js");
document.write(m2);
document.write("<br>");

/*es6*/
require("./es6test2.js");

OpenLayers 3实践与原理探究1-ol2 VS ol3

发表于 2016-09-28 | 更新于 2018-11-30 | 分类于 WebGIS

本文的重点在OpenLayers 3,对于OpenLayers 2简单比较说明。
下文中OpenLayers 2简称OL2,OpenLayers 3简称OL3

1.OL 2 VS OL 3简单源码和实例

1.1 OpenLayers 2

OpenLayers 是一个专为Web GIS 客户端开发提供的JavaScript 类库包,用于实现标准格式发布的地图数据访问。从OpenLayers2.2版本以后,OpenLayers已经将所用到的Prototype.js组件整合到了自身当中,并不断在Prototype.js的基础上完善面向对象的开发,Rico用到地方不多,只是在OpenLayers.Popup.AnchoredBubble类中圆角化DIV

1.1.1 OpenLayers 2源码简要分析

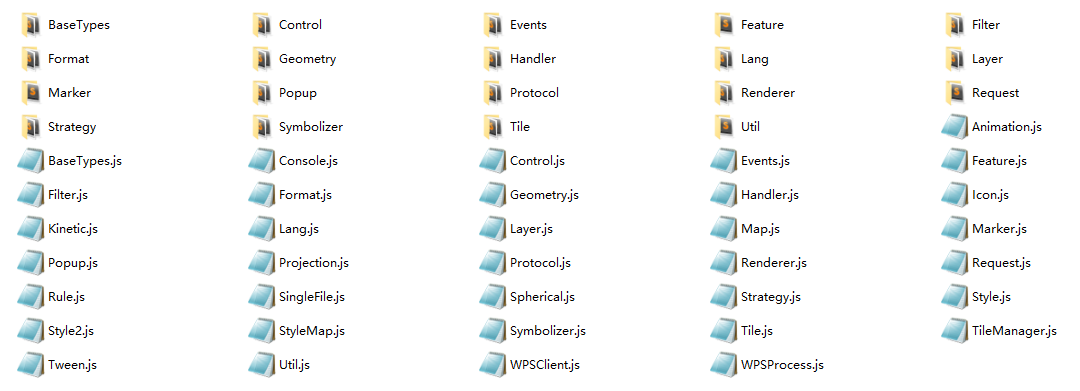
源码分析,下载版本为2.13.1,源码位置在lib/OpenLayers
ol2源码文件
由于OL2不是本文的重点,所以下面会简诉关于OL2源码。
lib/OpenLayers/Layer/Image.js

1
2
3
4
5
6
7
8
9
10
11
12
13
14
15
16
17
18
19
20
21
22
23
24
25
26
27
28
29
30
31
OpenLayers.Layer.Image = OpenLayers.Class(OpenLayers.Layer, {
isBaseLayer: true,
url: null,
extent: null,
size: null,
tile: null,
aspectRatio: null,
initialize: function(name, url, extent, size, options) {
//...
},
destroy: function() {
//...
},
clone: function(obj) {
//...
},
setMap: function(map) {
//...
},
moveTo:function(bounds, zoomChanged, dragging) {
//...
},
setTileSize: function() {
//...
},
addTileMonitoringHooks: function(tile) {
//...
},
//...
CLASS_NAME: "OpenLayers.Layer.Image"
});

OpenLayers.Layer.Image 继承了OpenLayers.Layer类
OpenLayers.Layer在上级目录下lib/OpenLayers/Layer.js

1
2
3
4
5
6
7
8
9
10
11
12
13
14
15
16
17
18
OpenLayers.Layer = OpenLayers.Class({
id: null,
name: null,
//...
initialize: function(name, options) {
//...
},
destroy: function(setNewBaseLayer) {
//...
},
clone: function (obj) {
//...
},
getOptions: function() {
//...
},
CLASS_NAME: "OpenLayers.Layer"
});

通过分析我们可以知道,OpenLayers.Class的第一个参数是等号前面类(A类)继承的类;第二个参数是个对象,前面的部分作为A类的属性,后面的作为A类的方法。通过观察前三个方法我们可以看出,前三个方法依次为initialize,destroy,clone,分别为A类的初始化构造函数,销毁函数,克隆函数。

1.1.2 OpenLayers 2简单实例

1
2
3
4
5
6
7
8
9
10
11
12
13
14
15
16
17
18
19
20
21
22
23
24
25
26
27
28
29
30
31
32
33
34
35
36
37
38
39
40
41
<!DOCTYPE html>
<html>

<head>
<meta charset="UTF-8">
<title>
创建一个简单的电子地图
</title>
<!-- 加载OpenLayers 类库 -->
<script type="text/javascript" src="http://www.openlayers.cn/olapi/OpenLayers.js">
</script>
<style>
html,
body {
width: 100%;
height: 100%;
margin: 0;
padding: 0;
}
</style>
<!-- 关键代码在这里了 -->
<script type="text/javascript">
function init() {
// 使用指定的文档元素创建地图
var map = new OpenLayers.Map("rcp1_map");
// 创建一个 OpenStreeMap raster layer
// 把这个图层添加到map中
var osm = new OpenLayers.Layer.OSM();
map.addLayer(osm);
// 设定视图缩放地图程度为最大
map.zoomToMaxExtent();
}
</script>
</head>

<body onload="init()">
<div id="rcp1_map" style="width: 100%;height: 100%;">
</div>
</body>

</html>

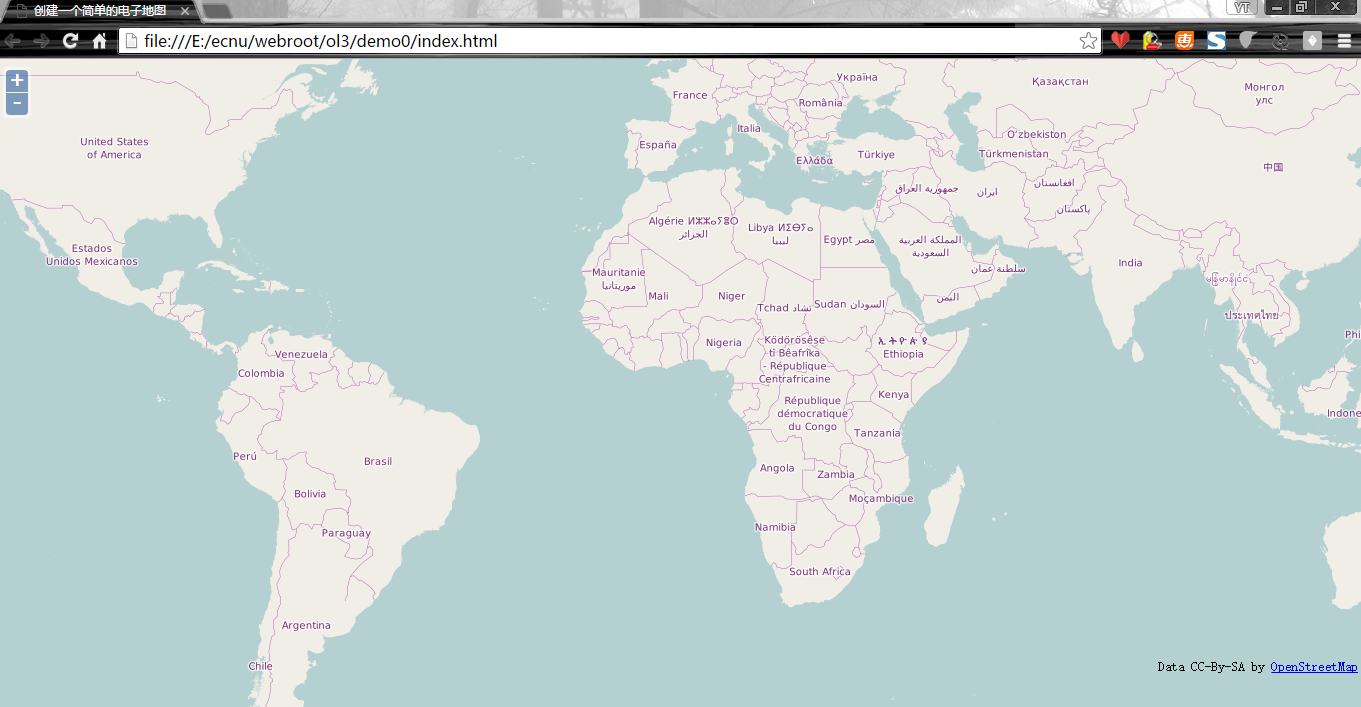
ol2实例显示效果

1.2 OpenLayers 3

1.2.1 OpenLayers 3源码简要分析

OpenLayers 3对OpenLayers网络地图库进行了根本的重新设计。版本2虽然被广泛使用,但从JavaScript开发的早期发展阶段开始,已日益现实出它的落后。 OL3已运用现代的设计模式从底层重写。

最初的版本旨在支持第2版提供的功能,提供大量商业或免费的瓦片资源以及最流行的开源矢量数据格式。与版本2一样,数据可以被任意投影。最初的版本还增加了一些额外的功能,如能够方便地旋转地图以及显示地图动画。
OpenLayers3同时设计了一些主要的新功能,如显示三维地图,或使用WebGL快速显示大型矢量数据集,这些功能将在以后的版本中加入。

源码分析,下载版本为3.17.1,源码位置在ol/ol文件夹下
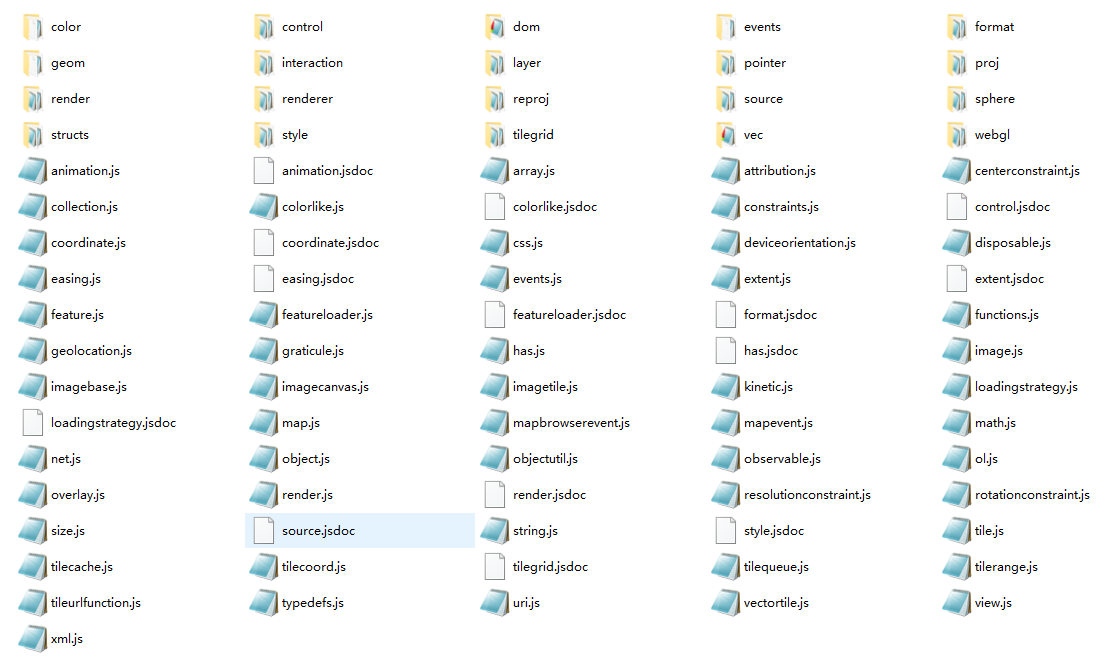
ol3源码文件
ol/ol/layer/layer.js

1
2
3
4
5
6
7
8
9
10
11
12
13
14
15
16
17
18
19
20
21
22
23
24
25
26
27
28
29
30
31
32
33
34
35
36
37
38
39
40
41
42
43
44
45
goog.provide('ol.layer.Layer');

goog.require('ol.events');
goog.require('ol.events.EventType');
goog.require('ol');
goog.require('ol.Object');
goog.require('ol.layer.Base');
goog.require('ol.layer.LayerProperty');
goog.require('ol.object');
goog.require('ol.render.EventType');
goog.require('ol.source.State');

ol.layer.Layer = function(options) {
var baseOptions = ol.object.assign({}, options);
delete baseOptions.source;

ol.layer.Base.call(this, /** @type {olx.layer.BaseOptions} */ (baseOptions));//继承extends {ol.layer.Base}
this.mapPrecomposeKey_ = null;
this.mapRenderKey_ = null;
this.sourceChangeKey_ = null;

if (options.map) {
this.setMap(options.map);
}

ol.events.listen(this,
ol.Object.getChangeEventType(ol.layer.LayerProperty.SOURCE),
this.handleSourcePropertyChange_, this);

var source = options.source ? options.source : null;
this.setSource(source);
};
ol.inherits(ol.layer.Layer, ol.layer.Base);

ol.layer.Layer.visibleAtResolution = function(layerState, resolution) {
//...
};

ol.layer.Layer.prototype.getLayersArray = function(opt_array) {
//...
};
ol.layer.Layer.prototype.getLayerStatesArray = function(opt_states) {
//...
};
//...

OL3利用google的closure库组织代码的,库文件在源码的closure-library文件夹下。
在源码中用到的常用的功能是:

  • 类声明:使用goog.provide方法声明和注册一个类(表示自己能提供什么功能)。
  • 依赖声明:使用goog.require方法声明具体依赖的其它类(表示提供这些功能需要额外的哪功能的支持)
    这一点也是OL2和OL3源代码重写的最重要的变化。

1.2.1 OpenLayers 3实例

1
2
3
4
5
6
7
8
9
10
11
12
13
14
15
16
17
18
19
20
21
22
23
24
25
26
27
28
29
30
31
32
33
34
35
<!doctype html>
<html lang="en">

<head>
<link rel="stylesheet" href="http://openlayers.org/en/v3.17.1/css/ol.css" type="text/css">
<style>
.map {
height: 400px;
width: 100%;
}
</style>
<script src="http://openlayers.org/en/v3.17.1/build/ol.js" type="text/javascript"></script>
<title>OpenLayers 3 example</title>
</head>

<body>
<h2>My Map</h2>
<div id="map" class="map"></div>
<script type="text/javascript">
var map = new ol.Map({
target: 'map',
layers: [
new ol.layer.Tile({
source: new ol.source.OSM()
})
],
view: new ol.View({
center: ol.proj.fromLonLat([37.41, 8.82]),
zoom: 4
})
});
</script>
</body>

</html>

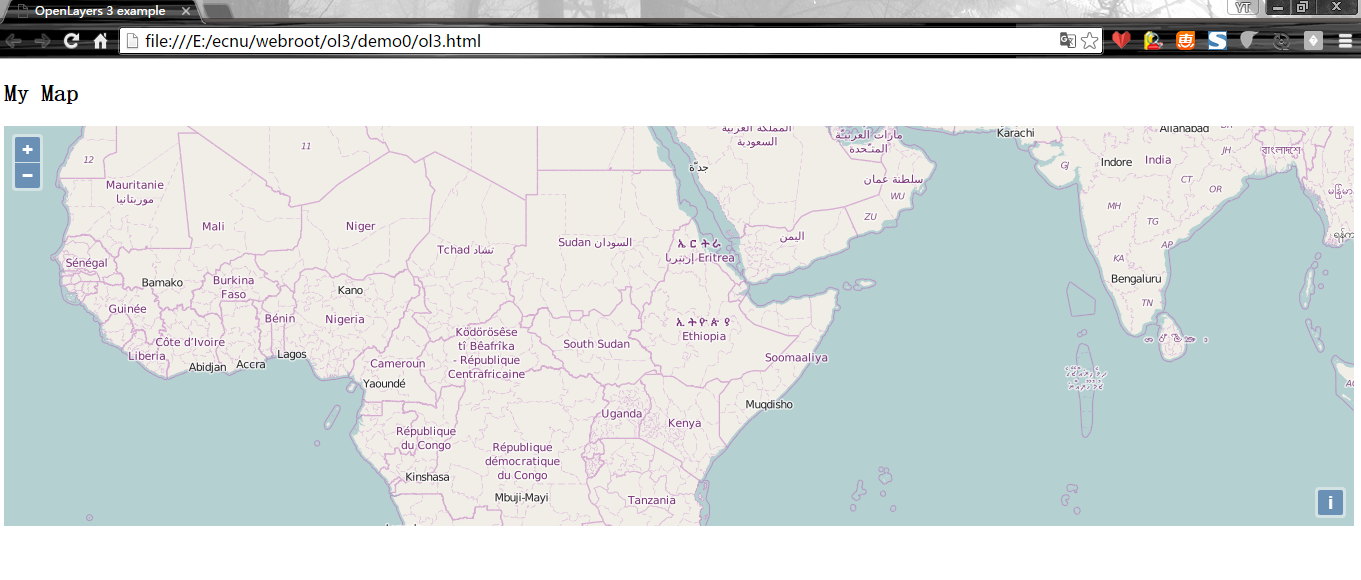
ol3实例显示效果

2.OL 2 VS OL 3变化简要总结

比较部分 OL2 OL3
源码 使用Prototype和Rico 使用Clourse
实现 var map = new OpenLayers.Map(“rcp1_map”);var osm = new OpenLayers.Layer.OSM();map.addLayer(osm); var map = new ol.Map({});
渲染方式 dom canvas/webgl/dom

补充说明:
三种渲染方式可以在ol/ol/map.js看到

1
2
3
4
5
ol.DEFAULT_RENDERER_TYPES = [
ol.RendererType.CANVAS,
ol.RendererType.WEBGL,
ol.RendererType.DOM
];
  • dom是OL2常用的方式,显示地图时候(如openstreetmap)会采用img集合的方式。
  • OL3常用的渲染方式是基于canvas绘图技术。
  • WebGL快速显示大型矢量数据集
    OL2和OL3的差别比较大,目前看从OL2升级OL3的比较麻烦。
    最后分享一个ol2和ol3的资料,包含源码,教程和书籍

参考阅读:

  • 1.2-2015_OpenLayers_3_入门教程详细版.pdf
  • OpenLayers
  • OpenLayers 3官网
  • OpenLayers 2官网
  • google closure库
  • JS 库浅析之 Google Closure

OpenLayers 3实践与原理探究4.3-ol3源码分析-Source,Layer

发表于 2016-09-28 | 更新于 2018-11-30 | 分类于 WebGIS

3.Source

ol/ol/Source文件夹下

3.1构造函数

3.1.1 ol.source.Source ol.source的基础类

ol/ol/Source/source.js

1
ol.source.Source = function(options) {}

3.1.2 ol.source.OSM

ol/ol/Source/osmsource.js
openStreetMap:

1
ol.source.OSM = function(opt_options) {}

具体不进行展开描述。
运用实例:

1
var osmSource = new ol.source.OSM();

3.1.3 ol.source.TileWMS

先看个例子:

1
2
3
4
5
6
7
8
9
10
11
12
13
14
15
var map = new ol.Map({
target: 'map', //document.getElementById("map")
layers: [
new ol.layer.Tile({
title: "Global Imagery",
source: new ol.source.TileWMS({
url: 'http://demo.boundlessgeo.com/geoserver/wms',
params: {
'LAYERS': 'ne:NE1_HR_LC_SR_W_DR'
}
})
})
],

});

我们可以一路找下源头:
tilewmssource.js–>tileimagessource.js–>uritilesource.js–>tilespurce.js–>source.js
我们可以发现实例中的source.url是在uritilesource.js
处理的
我们先考虑单url的情况(当然存在url数组的情况)

1
2
3
4
5
6
7
8
9
10
if (options.url) {
this.setUrl(options.url);
}
//... ...
ol.source.UrlTile.prototype.setUrl = function(url) {
var urls = this.urls = ol.TileUrlFunction.expandUrl(url);
this.setTileUrlFunction(this.fixedTileUrlFunction ?
this.fixedTileUrlFunction.bind(this) :
ol.TileUrlFunction.createFromTemplates(urls, this.tileGrid), url);
};

处理函数为fixedTileUrlFunction,在tilewmssource.js
fixedTileUrlFunction–>getRequestUrl_–>ol.uri.appendParams(url, params)请求地图
params包含请求地图的宽、高、分辨率、地图范围

4.Layer

ol/ol/Layer文件夹下

4.1构造函数

4.1.1 ol/ol/Layer/layer.js

1
ol.layer.Layer = function(options) {}
1
ol.inherits(ol.layer.Layer, ol.layer.Base);

ol.layer.Base定义layer的基本属性和基本属性的setter,getter方法

实际在api接口上使用的是具体的图层

4.1.2 矢量地图ol/ol/Layer/vectorlayer.js

1
2
3
4
ol.layer.Vector = function(opt_options) {
var baseOptions = ol.object.assign({}, options);
ol.layer.Layer.call(this, /** @type {olx.layer.LayerOptions} */ (baseOptions));
}

实际调用的方法,仍然在ol/ol/Layer/layer.js中

4.1.3 瓦块地图ol/ol/Layer/titlelayer.js

1
2
3
4
ol.layer.Tile = function(opt_options) {
var baseOptions = ol.object.assign({}, options);
ol.layer.Layer.call(this, /** @type {olx.layer.LayerOptions} */ (baseOptions));
}

还有heatmaplayer.js,imagelayer.js,vectortilelayer.js对应热力图,图片地图,矢量瓦块地图
总结:
ol/ol/Layer/layer.js是通用的方法部分
各个具体的地图*.js是各个地图的专有方法。
运用实例:

1
2
3
4
5
6
7
8
9
10
11
12
13
14
15
var map = new ol.Map({
target: 'map', //document.getElementById("map")
layers: [
new ol.layer.Tile({
title: "Global Imagery",
source: new ol.source.TileWMS({
url: 'http://demo.boundlessgeo.com/geoserver/wms',
params: {
'LAYERS': 'ne:NE1_HR_LC_SR_W_DR'
}
})
})
],

});

source在layer.js中处理

1
2
3
4
5
6
var source = options.source ? options.source : null;
this.setSource(source);

ol.layer.Layer.prototype.setSource = function(source) {
this.set(ol.layer.LayerProperty.SOURCE, source);//添加到常量上,其实也是将source对象共享出去了
};

4.2方法 事件

4.2.1 ol/ol/Layer/layer.js

主要是一下方法

1
2
3
4
5
6
7
8
9
ol.layer.Layer.visibleAtResolution
getLayersArray
getLayerStatesArray
getSource
getSourceState
handleSourceChange_
handleSourcePropertyChange_
setMap
setSource

OpenLayers 3实践与原理探究3-ol3一个完整的例子

发表于 2016-09-28 | 更新于 2018-11-30 | 分类于 WebGIS

【注】所有代码挂在我的github上,本例对应demo3

接着我们看一个比较长的例子,例子实现的是可以绘制图形,可以根据自己的设置打印地图。
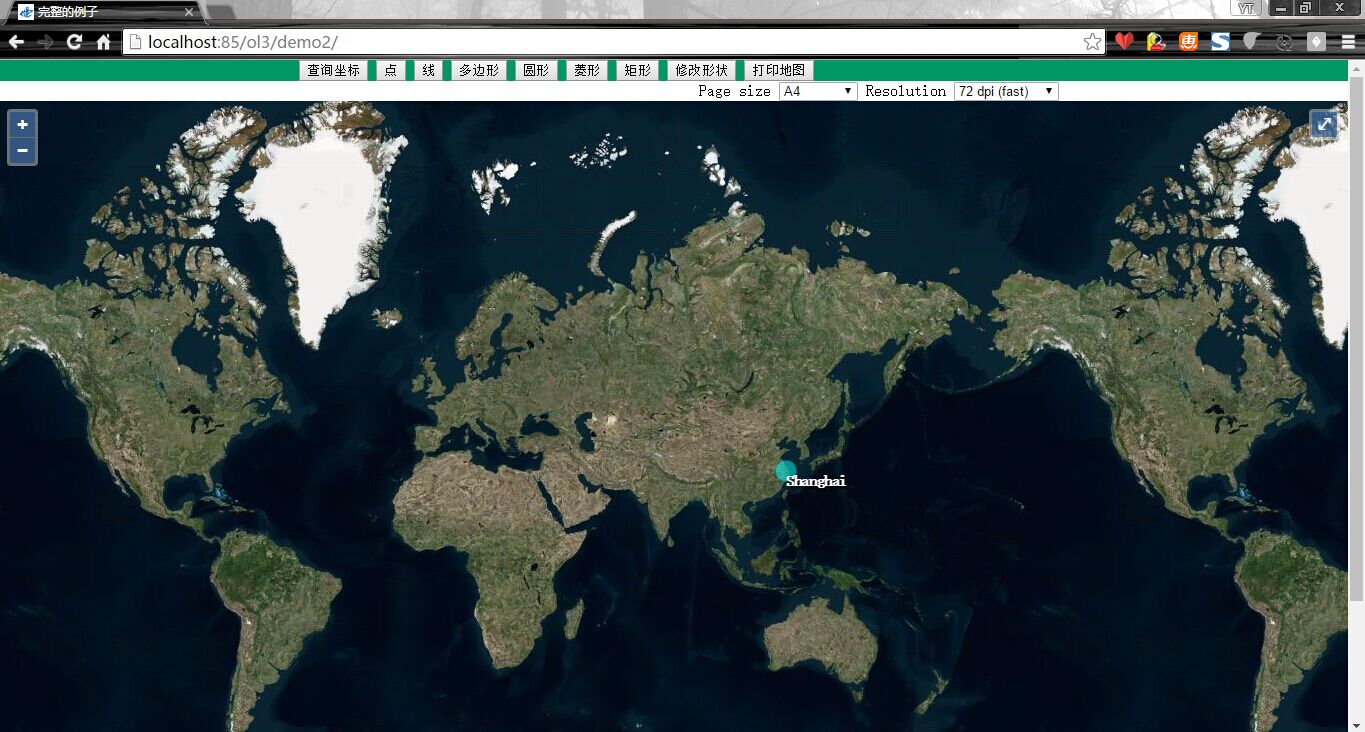
我们先看显示效果是:

ol3完整例子显示效果
由于ol3的api现在更新变化挺大的,所以自己运行的例子的时候注意版本是3.17.1
例子中的解释比较详细,不具体进行展开介绍。本例子主要分为三部分,在js文件中已经隔开

  • 第一部分是地图的初始化,包括添加图层,添加控件
  • 第二部分加个标注点,点击显示位置的弹出框
  • 第三部分自定义工具,包括点、线、面、圆形、菱形、矩形、多边形的绘制工具和打印地图工具
    为了节省篇幅,index.css在这里就不在列出,详情可以查看百度云共享的资源
    indxe.html
1
2
3
4
5
6
7
8
9
10
11
12
13
14
15
16
17
18
19
20
21
22
23
24
25
26
27
28
29
30
31
32
33
34
35
36
37
38
39
40
41
42
43
44
45
46
47
48
49
50
51
52
53
54
55
56
<!DOCTYPE html>
<html lang="en">

<head>
<meta charset="UTF-8">
<title>完整的例子</title>
<link rel="stylesheet" href="css/index.css">
<link rel="stylesheet" href="pubjs/v3.17.1-dist/ol.css">
<script src="https://cdnjs.cloudflare.com/ajax/libs/jspdf/1.2.61/jspdf.min.js"></script>
</head>

<body>
<div class="toolsets">
<button id="search-position" class="search-position btn btn-success btn-sm">查询坐标</button>
<button id="draw-point" class="draw-point btn btn-success btn-sm">点</button>
<button id="draw-line" class="draw-line btn btn-success btn-sm">线</button>
<button id="draw-ploygon" class="draw-ploygon btn btn-success btn-sm">多边形</button>
<button id="draw-circle" class="draw-circle btn btn-success btn-sm">圆形</button>
<button id="draw-square" class="draw-square btn btn-success btn-sm">菱形</button>
<button id="draw-box" class="draw-box btn btn-success btn-sm">矩形</button>
<button id="reshape" class="reshape btn btn-info btn-sm">修改形状</button>
<button id="print" class="print btn btn-info btn-sm">打印地图</button>
</div>
<!-- 打印地图的设置 -->
<form class="form print-form">
<label>Page size </label>
<select id="format">
<option value="a0">A0 (slow)</option>
<option value="a1">A1</option>
<option value="a2">A2</option>
<option value="a3">A3</option>
<option value="a4" selected>A4</option>
<option value="a5">A5 (fast)</option>
</select>
<label>Resolution </label>
<select id="resolution">
<option value="72">72 dpi (fast)</option>
<option value="150">150 dpi</option>
<option value="300">300 dpi (slow)</option>
</select>
</form>
<div id="map" class="map">
<div style="display: none;">
<!-- Clickable label for Vienna -->
<a class="overlay" id="Shanghai" target="_blank" href="http://en.wikipedia.org/wiki/Shanghai">Shanghai</a>
<div id="marker" title="Marker"></div>
<!-- Popup -->
<div id="popup" title="点击查询:"></div>
</div>
</div>
<script type="text/javascript" src="pubjs/jquery.js"></script>
<script type="text/javascript" src="pubjs/v3.17.1-dist/ol-debug.js"></script>
<script type="text/javascript" src="js/index.js"></script>
</body>

</html>

index.js

1
2
3
4
5
6
7
8
9
10
11
12
13
14
15
16
17
18
19
20
21
22
23
24
25
26
27
28
29
30
31
32
33
34
35
36
37
38
39
40
41
42
43
44
45
46
47
48
49
50
51
52
53
54
55
56
57
58
59
60
61
62
63
64
65
66
67
68
69
70
71
72
73
74
75
76
77
78
79
80
81
82
83
84
85
86
87
88
89
90
91
92
93
94
95
96
97
98
99
100
101
102
103
104
105
106
107
108
109
110
111
112
113
114
115
116
117
118
119
120
121
122
123
124
125
126
127
128
129
130
131
132
133
134
135
136
137
138
139
140
141
142
143
144
145
146
147
148
149
150
151
152
153
154
155
156
157
158
159
160
161
162
163
164
165
166
167
168
169
170
171
172
173
174
175
176
177
178
179
180
181
182
183
184
185
186
187
188
189
190
191
192
193
194
195
196
197
198
199
200
201
202
203
204
205
206
207
208
209
210
211
212
213
214
215
216
217
218
219
220
221
222
223
224
225
226
227
228
229
230
231
232
233
234
235
236
237
238
239
240
241
242
243
244
245
246
247
248
/********************************************************************************************/
var view = new ol.View({
center: [9101767, 2822912],
zoom: 6
}); //map.view的变量
/*图层*/
var bglayer = new ol.layer.Tile({
source: new ol.source.BingMaps({
// key: 'Your Bing Maps Key from http://www.bingmapsportal.com/here',
key: 'AgiU9gCjKNfaR2yFSDfLw8e9zUlAYisRvRC2_L-LsGYN2bII5ZUvorfP3QJvxmjn', //自己申请的key
imagerySet: 'Aerial'
})
});
var source = new ol.source.Vector({ wrapX: false });
//绘图绘在此矢量图层
var vector = new ol.layer.Vector({
source: source,
style: new ol.style.Style({ //修改绘制的样式
fill: new ol.style.Fill({
color: 'rgba(255, 255, 255, 0.2)'
}),
stroke: new ol.style.Stroke({
color: '#ffcc33',
width: 2
}),
image: new ol.style.Circle({
radius: 7,
fill: new ol.style.Fill({
color: '#ffcc33'
})
})
})
});

var map = new ol.Map({
controls: ol.control.defaults().extend([
new ol.control.FullScreen(), //全屏控件
new ol.control.ScaleLine(), //比例尺
new ol.control.OverviewMap(), //鹰眼控件
// new ol.control.Zoom(),
]),
layers: [bglayer, vector], //添加两个图层
target: 'map', //div#id='map'
view: view,
// interaction:
});


/**上面的部分就可以初始化地图**/
/********************************************************************************************/
/**
* Marker标注
*/
var pos = ol.proj.fromLonLat([121.3725, 31.008889]); //经纬度坐标转换
// Vienna marker
var marker = new ol.Overlay({
position: pos,
positioning: 'center-center',
element: document.getElementById('marker'),
stopEvent: false
});
map.addOverlay(marker);
// Shanghai label
var Shanghai = new ol.Overlay({
position: pos,
element: document.getElementById('Shanghai')
});
map.addOverlay(Shanghai); //标签 a
/**
* Popup查询坐标弹出框
*/
// Popup showing the position the user clicked
var container = document.getElementById('popup');
var content = document.getElementById('popup-content');
var closer = document.getElementById('popup-closer');

var popup = new ol.Overlay({
element: container,
autoPan: true,
autoPanAnimation: {
duration: 250
}
});
map.addOverlay(popup);
//关闭popup
closer.onclick = function() {
popup.setPosition(undefined);
closer.blur();
return false;
};

$('.search-position').click(function(event) {
map.removeInteraction(draw); //点击选择时候 取消上次结果

//在地图上点击
map.on('click', function(evt) {
var coordinate = evt.coordinate;
var hdms = ol.coordinate.toStringHDMS(ol.proj.transform(
coordinate, 'EPSG:3857', 'EPSG:4326'));

content.innerHTML = '<p>点击的坐标是:</p><code>' + hdms +
'</code>';
popup.setPosition(coordinate);
});

});
/********************************************************************************************/
/* 自定义工具 */
var draw, select, modify;
$('.toolsets button').click(function(event) {
console.log($(this).text());
var geometryFunction, shapeName, maxPoints;
map.removeInteraction(draw); //点击选择时候 取消绘图交互
map.removeInteraction(select); //点击选择时候 取消选择
map.removeInteraction(modify); //点击选择时候 取消修改
switch ($(this).text()) {
case "点":
shapeName = 'Point';
break;
case "线":
shapeName = 'LineString';
break;
case "多边形":
shapeName = 'Polygon';
break;
case "圆形":
shapeName = 'Circle';
break;
case "菱形":
shapeName = 'Circle';
geometryFunction = ol.interaction.Draw.createRegularPolygon(4);
break;
case "矩形":
shapeName = 'LineString';
maxPoints = 2;
geometryFunction = function(coordinates, geometry) {
if (!geometry) {
geometry = new ol.geom.Polygon(null);
}
var start = coordinates[0];
var end = coordinates[1];
geometry.setCoordinates([
[start, [start[0], end[1]], end, [end[0], start[1]], start]
]);

return geometry;
};
break;
case "修改形状":
reshape.init();
break;
case "打印地图":
printMap.init();
break;
}

draw = new ol.interaction.Draw({
source: source,
type: /** @type {ol.geom.GeometryType} */ (shapeName),
geometryFunction: geometryFunction,
maxPoints: maxPoints
});
map.addInteraction(draw); //增加的交互
});
/*修改地图*/
var reshape = {
init: function() {
// select选择形状
// modify修改形状
var select = new ol.interaction.Select({
wrapX: false
});

var modify = new ol.interaction.Modify({
features: select.getFeatures()
});
// var selectModify = new ol.interaction.defaults().extend([select, modify]);
map.addInteraction(select);
map.addInteraction(modify);
//interactions: ol.interaction.defaults().extend([select, modify]),
}
};
/*打印地图*/
var printMap = {
init: function() {
map.removeInteraction(draw); //点击选择时候 取消绘制
var dims = {
a0: [1189, 841],
a1: [841, 594],
a2: [594, 420],
a3: [420, 297],
a4: [297, 210],
a5: [210, 148]
};
var loading = 0;
var loaded = 0;
// var exportButton = document.getElementById('export-pdf');
// exportButton.disabled = true;
document.body.style.cursor = 'progress';

var format = document.getElementById('format').value;
var resolution = document.getElementById('resolution').value;
var dim = dims[format];
var width = Math.round(dim[0] * resolution / 25.4);
var height = Math.round(dim[1] * resolution / 25.4);
var size = /** @type {ol.Size} */ (map.getSize());
var extent = map.getView().calculateExtent(size);

var source = bglayer.getSource();
var tileLoadStart = function() {
++loading;
};

var tileLoadEnd = function() {
++loaded;
if (loading === loaded) {
var canvas = this;
window.setTimeout(function() {
loading = 0;
loaded = 0;
var data = canvas.toDataURL('image/png'); //canvas
var pdf = new jsPDF('landscape', undefined, format);
pdf.addImage(data, 'JPEG', 0, 0, dim[0], dim[1]);
pdf.save('map.pdf');
source.un('tileloadstart', tileLoadStart);
source.un('tileloadend', tileLoadEnd, canvas);
source.un('tileloaderror', tileLoadEnd, canvas);
map.setSize(size);
map.getView().fit(extent, size);
map.renderSync();
// exportButton.disabled = false;
document.body.style.cursor = 'auto';
}, 100);
}
};

map.once('postcompose', function(event) {
source.on('tileloadstart', tileLoadStart);
source.on('tileloadend', tileLoadEnd, event.context.canvas);
source.on('tileloaderror', tileLoadEnd, event.context.canvas);
});

map.setSize([width, height]);
map.getView().fit(extent, /** @type {ol.Size} */ (map.getSize()));
map.renderSync();
}

};

webpack项目实践

发表于 2016-09-28 | 更新于 2018-11-30 | 分类于 前端技术

1.目录结构初步构想

上面的例子只是介绍了webpack的基本用法,并没有按照一个实际的项目进行构建目录结构,对于一个多页面的项目我们定义的目录结构如下

1
2
3
4
5
6
7
8
9
10
11
12
13
14
15
16
17
18
19
20
21
22
23
24
25
26
- web/                  # web根目录
- src/ # 开发目录
- home/ # 主页目录
+ css/ # css/sass资源目录
+ img/ # 图片资源目录
+ js/ # js&jsx资源目录
entry.js # webpack入口文件
home.html # 页面文件
- about/ # about页目录
+ css/ # css/sass资源目录
+ img/ # 图片资源目录
+ js/ # js&jsx资源目录
entry.js # webpack入口文件
about.html # about页面文件
- dist/ # 编译输出目录,即发布目录
- home/ # 编译输出的home目录
- about/ # 编译输出的about目录
- common/ # 编译输出的公共资源目录
+ js/ # 编译输出的公共js目录
+ css/ # 编译输出的公共css目录
+ img/ # 编译输出的公共图片目录
- index.html # 系统html入口
webpack.config.js # webpack配置文件
package.json # 项目配置
.babelrc # 配置es-2015
README.md # 项目说明

将上两篇博客webpack基础实践1-2中的例子配置文件改成如下

1
2
3
4
5
6
7
8
9
10
11
12
13
14
15
16
17
18
var path = require("path");

module.exports = {
entry: "./src/home/entry.js", //入口文件
output: {
path: path.join(__dirname, 'dist','home'),
filename: "bundle.js",
publicPath:'./images/'//可以限定图片生成位置的路径
},
module: {
loaders: [
{ test: /\.css$/, loader: "style!css" }, //css加载器
{ test: /\.scss$/, loader: "style!css!sass" }, //sass加载器
{ test: /\.(jpg|png)$/, loader: "url?limit=8192&name=../images/[hash].[ext]" }, //图片加载器[name].[ext] limit 是限制大小,大于这个尺寸会是单独的图片,小于这个尺寸是base64的形式
{ test: /\.js$/, exclude: /node_modules/, loader: 'babel-loader', }//babel加载器
]
}
};

入口文件等只需要改换成相对路径即可

2.独立css文件

需要配合插件一起使用

1
npm install extract-text-webpack-plugin --save-dev

比1中配置文件增加/修改的内容

1
2
3
4
5
6
7
8
9
10
11
12
13
var ExtractTextPlugin = require("extract-text-webpack-plugin");
module.exports = {
//... ...
module: {
loaders: [
{ test: /\.css$/, loader: ExtractTextPlugin.extract("style-loader", "css-loader")}, //css加载器
{ test: /\.scss$/, loader: ExtractTextPlugin.extract("style-loader", "css-loader!sass-loader")}, //sass加载器
]
},
plugins: [
new ExtractTextPlugin("[name].css")
]
};

此时在html文件中引入就可以了

1
<link rel="stylesheet" href="./home/main.css">

3.多入口

为了模拟数据,我们在home文件夹下新建了一个entry2.js入口

1
2
3
4
var m2 = require("./module2.js");
document.write(m2);
/*es6*/
require("./es6test2.js");

配置文件如下

1
2
3
4
5
6
7
8
9
10
11
12
13
14
15
16
17
18
19
20
21
22
23
24
25
var path = require("path");
var ExtractTextPlugin = require("extract-text-webpack-plugin");

module.exports = {
entry: {
page1:"./src/home/entry.js",
page2:"./src/home/entry2.js"

}, //入口文件
output: {
path: path.join(__dirname, 'dist','home'),
filename: "[name].js",
},
module: {
loaders: [
{ test: /\.css$/, loader: ExtractTextPlugin.extract("style-loader", "css-loader")}, //css加载器
{ test: /\.scss$/, loader: ExtractTextPlugin.extract("style-loader", "css-loader!sass-loader")}, //sass加载器
{ test: /\.(jpg|png)$/, loader: "url?limit=8192&name=../images/[hash].[ext]" },
{ test: /\.js$/, exclude: /node_modules/, loader: 'babel-loader', }
]
},
plugins: [
new ExtractTextPlugin("[name].css")
]
};

这个时候需要在index.html中分别引入

1
2
3
4
5
6
7
8
9
10
11
12
13
14
15
<html>

<head>
<meta charset="utf-8">
<link rel="stylesheet" href="./home/page1.css">
<link rel="stylesheet" href="./home/page2.css">
</head>

<body>
<script src="./home/page1.js"></script>
<script src="./home/page2.js"></script>
<div class="img"></div>
</body>

</html>

4.提取公共部分

第3部分中给出的entry2.js和entry.js是有相同的部分的,我们想要实现的是可以提取出两者的公共部分。
配置文件中增加

1
2
3
4
5
var webpack = require('webpack');
//... ...
plugins: [
new webpack.optimize.CommonsChunkPlugin('common.js')
]

如果公共部分想单列一个文件夹下,可以

1
new webpack.optimize.CommonsChunkPlugin('../common/js/common.js')

在html文件中引入common.js文件即可

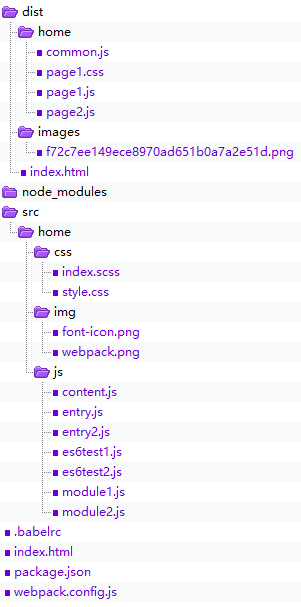
5.实践后的项目目录

OpenLayers 3实践与原理探究4.2-ol3源码分析-Map,View

发表于 2016-09-28 | 更新于 2018-11-30 | 分类于 WebGIS

1.Map

ol/ol/map.js

1.1构造函数

1
2
3
4
ol.Map = function(options) {
ol.Object.call(this);//@extends {ol.Object}
var optionsInternal = ol.Map.createOptionsInternal(options);
}

常量对象共享地图设置,并且将常量对象共享出去,作为公用变量

1
2
3
4
5
6
7
goog.provide('ol.MapProperty');
ol.MapProperty = {
LAYERGROUP: 'layergroup',
SIZE: 'size',
TARGET: 'target',
VIEW: 'view'
};

createOptionsInternal函数对map中的配置对象进行处理。

1
2
3
4
5
6
7
8
9
10
11
12
13
14
15
16
17
18
19
20
//分别处理layer、layerGroup、target、view、renderer、controls、interactions、overlays
var layerGroup = (options.layers instanceof ol.layer.Group) ?
options.layers : new ol.layer.Group({layers: options.layers});
values[ol.MapProperty.LAYERGROUP] = layerGroup;

values[ol.MapProperty.TARGET] = options.target;

values[ol.MapProperty.VIEW] = options.view !== undefined ?
options.view : new ol.View();

//......
return {
controls: controls,
interactions: interactions,
keyboardEventTarget: keyboardEventTarget,
logos: logos,
overlays: overlays,
rendererConstructor: rendererConstructor,
values: values
};

运用实例-初始化:

1
2
3
4
5
6
7
8
9
var map = new ol.Map({
controls: ol.control.defaults().extend([
new ol.control.ScaleLine(), //比例尺
]),
layers: [bglayer, vector], //添加两个图层
target: 'map', //div#id='map'
view: view,
interaction:interaction
});

1.2 方法 事件

方法 事件列表:

1
2
3
4
5
6
7
8
9
10
11
12
13
14
15
16
17
18
19
20
21
22
23
24
25
26
27
28
29
30
31
32
33
34
35
36
37
38
39
40
41
42
43
44
45
46
47
addControl
addInteraction
addLayer
addOverlay
beforeRender
changed
dispatchEvent
forEachFeatureAtPixel
forEachLayerAtPixel
get
getControls
getCoordinateFromPixel
getEventCoordinate
getEventPixel
getInteractions
getKeys
getLayerGroup
getLayers
getOverlayById
getOverlays
getPixelFromCoordinate
getProperties
getRevision
getSize
getTarget
getTargetElement
getView
getViewport
hasFeatureAtPixel
on
once
removeControl
removeInteraction
removeLayer
removeOverlay
render
renderSync
set
setLayerGroup
setProperties
setSize
setTarget
setView
un
unByKey
unset
updateSize

实现方式举几个例子:

1
2
3
4
5
6
7
8
9
10
11
12
ol.Map.prototype.addControl = function(control) {
var controls = this.getControls();
goog.asserts.assert(controls !== undefined, 'controls should be defined');
controls.push(control);
};

ol.Map.prototype.addInteraction = function(interaction) {
var interactions = this.getInteractions();
goog.asserts.assert(interactions !== undefined,
'interactions should be defined');
interactions.push(interaction);
};

controls控件,控件添加到map上,对控件设置两个监听事件,增加、删除。

1
2
3
4
5
6
7
8
9
10
11
12
this.controls_ = optionsInternal.controls;
this.controls_.forEach( function(control) {
control.setMap(this);
}, this);

ol.events.listen(this.controls_, ol.CollectionEventType.ADD, function(event) {
event.element.setMap(this);
}, this);

ol.events.listen(this.controls_, ol.CollectionEventType.REMOVE, function(event) {
event.element.setMap(null);
}, this);

2.View

ol/ol/view.js

2.1构造函数

1
2
3
4
5
6
ol.View = function(opt_options) {
ol.Object.call(this);
var options = opt_options || {};
this.projection_ = ol.proj.createProjection(options.projection, 'EPSG:3857');
//... ...
}

运用实例:

1
2
3
4
5
6
7
8
9
10
var map = new ol.Map({
target: 'map',
view: new ol.View({
projection: 'EPSG:4326', //WGS 84
center: [0, 0],
zoom: 2,
maxResolution: 0.703125
}),

});
1
2
3
goog.provide('ol.View');
goog.provide('ol.ViewHint');
goog.provide('ol.ViewProperty');

提供不只是一个构造函数,还有两个常量对象,其中一个常量对象包含三个常量如下所示:

1
2
3
4
5
ol.ViewProperty = {
CENTER: 'center',
RESOLUTION: 'resolution',
ROTATION: 'rotation'
};

其实,我们在对象属性中写出来的,如center,作用等同于用下面介绍的方法setCenter,其本质是写入常量中,共享出去作为公用。

2.2方法 事件

举例;

1
2
3
ol.View.prototype.setCenter = function(center) {
this.set(ol.ViewProperty.CENTER, center);
};
1…567

Ruyi Zhao

70 日志
5 分类
52 标签
© 2018 Ruyi Zhao
由 Hexo 强力驱动 v3.8.0
|
主题 – NexT.Pisces v6.5.0