我也是个初学WebGL的人,这部分的内容是我在看完《WebGL编程指南》一书后的精简教程。看完之后我对三维世界重建了一些观念,这篇文章是尽量在有限的内容中,一下介绍几个重要的基本的概念,后面我会分几篇再详细介绍几个重要的概念。
WebGL是利用HTML5的canvas绘制和渲染三维图形,再现代的浏览器中均支持。WebGL是从OpenGL ES中继承过来的。
代码存储在我的GitHub中。
首先我们来绘制一个二维的实例,点击的时候绘制一个点。
示例程序:https://zrysmt.github.io/demo/webgl-demo/demo/0-simple.html.
1.WebGL二维:一次绘制一个点
html片段
注意WebGL canvas的坐标(右,z轴垂直屏幕向外)和二维canvas(左)不一样。
html片段很简单,我们使用就是canvas元素。1
2
3
4
5<body onload="main()">
<canvas id="webgl" width="400" height="400">
Please use a browser that supports "canvas"
</canvas>
</body>
WebGL执行流程
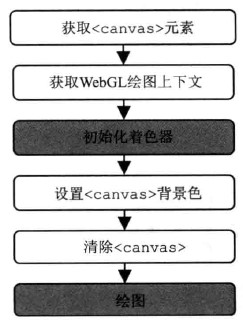
从main函数开始
1 | function main() { |
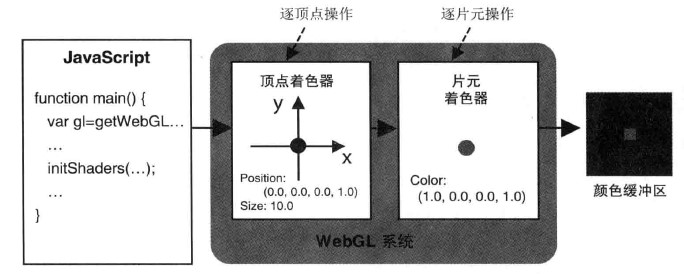
顶点着色器
用来描述顶点的特性(如位置、颜色等)1
2
3
4
5
6var VSHADER_SOURCE =
'attribute vec4 a_Position;\n' +
'void main() {\n' +
' gl_Position = a_Position;\n' +
' gl_PointSize = 10.0;\n' +
'}\n';
是一种类似C的语言。a_Position是一个attribute变量,vec4表示有四个浮点数组成的矢量。
片元着色器
进行逐片处理的过程如光照1
2
3
4var FSHADER_SOURCE =
'void main() {\n' +
' gl_FragColor = vec4(1.0, 0.0, 0.0, 1.0);\n' +
'}\n';
使用顶点着色器和片元着色器
初始化着色器
这部分的代码也是通用的,流程如下,具体代码我们在我的github中查看1
2
3
4
5
6
7* 1.创建着色器对象(gl.createShader())
* 2.向着色器对象中填充着色器程序的源代码(gl.shaderSource())
* 3.编译着色器(gl.compileShader())
* 4.创建程序对象(gl.createProgram())
* 5.为程序对象分配着色器(gl.attachShader())
* 6.连接程序对象(gl.linkProgram())
* 7.使用程序对象(gl.useProgram())
注册鼠标点击事件
注册鼠标事件,然后对坐标进行处理1
2
3canvas.onmousedown = function(ev) {
click(ev, gl, canvas, a_Position);
};
注意要转化为WebGL的坐标。1
2
3
4
5
6
7
8
9
10
11
12
13
14
15
16
17
18
19
20function click(ev, gl, canvas, a_Position) {
var x = ev.clientX; // 鼠标的x坐标
var y = ev.clientY; // 鼠标的y坐标
var rect = ev.target.getBoundingClientRect();
x = ((x - rect.left) - canvas.width / 2) / (canvas.width / 2); //处理后相得canvas的x坐标
y = (canvas.height / 2 - (y - rect.top)) / (canvas.height / 2); //处理后相得canvas的y坐标
g_points.push(x);
g_points.push(y);
gl.clear(gl.COLOR_BUFFER_BIT);
var len = g_points.length;
for (var i = 0; i < len; i += 2) {
// 将顶点位置传给attribute变量a_Position
gl.vertexAttrib3f(a_Position, g_points[i], g_points[i + 1], 0.0);
// 绘制
gl.drawArrays(gl.POINTS, 0, 1);
}
}
绘制
1 | gl.drawArrays(gl.POINTS, 0, 1); |

指定第一个参数可以绘制线或三角形,具体的这几个有什么意义,可以查看github中示例的源码。
2.WebGL二维:绘制多个点
一次性的将全部的点传给顶点着色器,这个时候就需要用到了缓冲对象。
我们以绘制个三角形为例(一次性至少传入三个点),示例程序:https://zrysmt.github.io/demo/webgl-demo/ch03/HelloTriangle.html。
效果如下所示: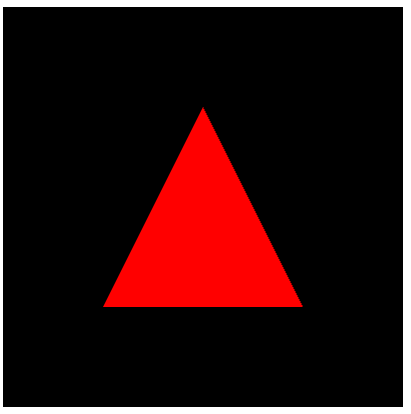
对应的源码位置:https://github.com/zrysmt/data-viz/blob/master/webgl/ch03/HelloTriangle.js
创建缓冲区对象
1 | function initVertexBuffers(gl) { |
3.WebGL二维-变换与动画
变换
学过线性代数的都知道矢量的变化是可以通过矩阵(4 X 4的,可以容纳下三种变化)完成的。
我们来看顶点着色器代码1
2
3
4
5
6var VSHADER_SOURCE =
'attribute vec4 a_Position;\n' +
'uniform mat4 u_xformMatrix;\n' +
'void main() {\n' +
' gl_Position = u_xformMatrix * a_Position;\n' +
'}\n';
u_xformMatrix就是变化的矩阵。
旋转示例:https://zrysmt.github.io/demo/webgl-demo/ch03/RotatedTriangle_Matrix.html
旋转示例源码:https://github.com/zrysmt/data-viz/blob/master/webgl/ch03/RotatedTriangle_Matrix.js
缩放示例:https://zrysmt.github.io/demo/webgl-demo/ch03/ScaledTriangle_Matrix.html
缩放示例源码:https://github.com/zrysmt/data-viz/blob/master/webgl/ch03/ScaledTriangle_Matrix.js
平移示例:https://zrysmt.github.io/demo/webgl-demo/ch03/TranslatedTriangle.html
平移示例源码:https://github.com/zrysmt/data-viz/blob/master/webgl/ch03/TranslatedTriangle.js
注意:以后关于矩阵的运算我们使用源码提供的库。旋转使用setRotate,rotate;平移使用setTranslate,translate;缩放使用setScale,scale.
这部分的使用1
2
3var formatMatrix = new Matrix4();
formatMatrix.setRotate(ANGLE,0, 0, 1); //绕z轴旋转ANGLE度数
formatMatrix.translate(Tx,Ty,Tz); //x,y,z轴上平移
第一个都要是带z的方法,后面的都不带即可。
https://github.com/zrysmt/data-viz/blob/master/webgl/lib/cuon-matrix.js
动画
动画的原理是使用HTML5 requestAnimationFrame()方法重绘WebGL图形。
示例:https://zrysmt.github.io/demo/webgl-demo/ch04/RotatingTriangle_withButtons.html
示例源码:https://github.com/zrysmt/data-viz/blob/master/webgl/ch04/RotatingTriangle_withButtons.js
4.WebGL二维-颜色与纹理
颜色
示例:https://zrysmt.github.io/demo/webgl-demo/ch05/ColoredTriangle.html
示例源码:https://github.com/zrysmt/data-viz/blob/master/webgl/ch05/ColoredTriangle.js
大概流程是这样的:
顶点坐标==>图形装配==>光栅化==>执行片元着色器1
2
3
4
5
6var verticesColors = new Float32Array([
// 坐标x,坐标y,颜色r,g,b
0.0, 0.5, 1.0, 0.0, 0.0,
-0.5, -0.5, 0.0, 1.0, 0.0,
0.5, -0.5, 0.0, 0.0, 1.0,
]);
initVertexBuffers函数对整个矩阵的处理,位置和颜色分别分配给a_Position和a_Color1
2gl.vertexAttribPointer(a_Position, 2, gl.FLOAT, false, FSIZE * 5, 0);
gl.vertexAttribPointer(a_Color, 3, gl.FLOAT, false, FSIZE * 5, FSIZE * 2);
1 | function initVertexBuffers(gl) { |
纹理
示例:https://zrysmt.github.io/demo/webgl-demo/ch05/TexturedQuad.html
示例源码:https://github.com/zrysmt/data-viz/blob/master/webgl/ch05/TexturedQuad.js
1 | var image = new Image(); // Create the image object |
逻辑函数1
2
3
4
5
6
7
8
9
10
11
12
13
14
15
16
17
18
19function loadTexture(gl, n, texture, u_Sampler, image) {
gl.pixelStorei(gl.UNPACK_FLIP_Y_WEBGL, 1); // Flip the image's y axis
// Enable texture unit0
gl.activeTexture(gl.TEXTURE0);
// Bind the texture object to the target
gl.bindTexture(gl.TEXTURE_2D, texture);
// Set the texture parameters
gl.texParameteri(gl.TEXTURE_2D, gl.TEXTURE_MIN_FILTER, gl.LINEAR);
// Set the texture image
gl.texImage2D(gl.TEXTURE_2D, 0, gl.RGB, gl.RGB, gl.UNSIGNED_BYTE, image);
// Set the texture unit 0 to the sampler
gl.uniform1i(u_Sampler, 0);
gl.clear(gl.COLOR_BUFFER_BIT); // Clear <canvas>
gl.drawArrays(gl.TRIANGLE_STRIP, 0, n); // Draw the rectangle
}
三维单独写一篇介绍。
参考阅读: